Bryndzové Halušky

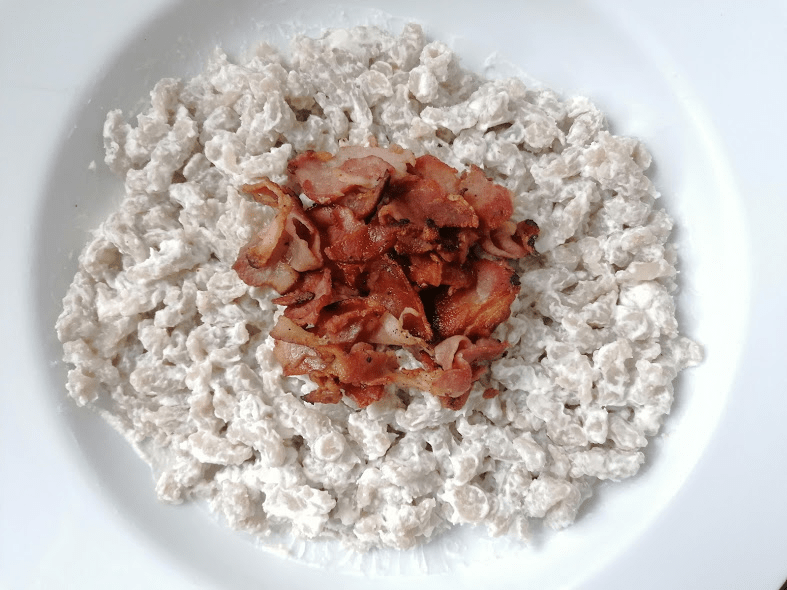
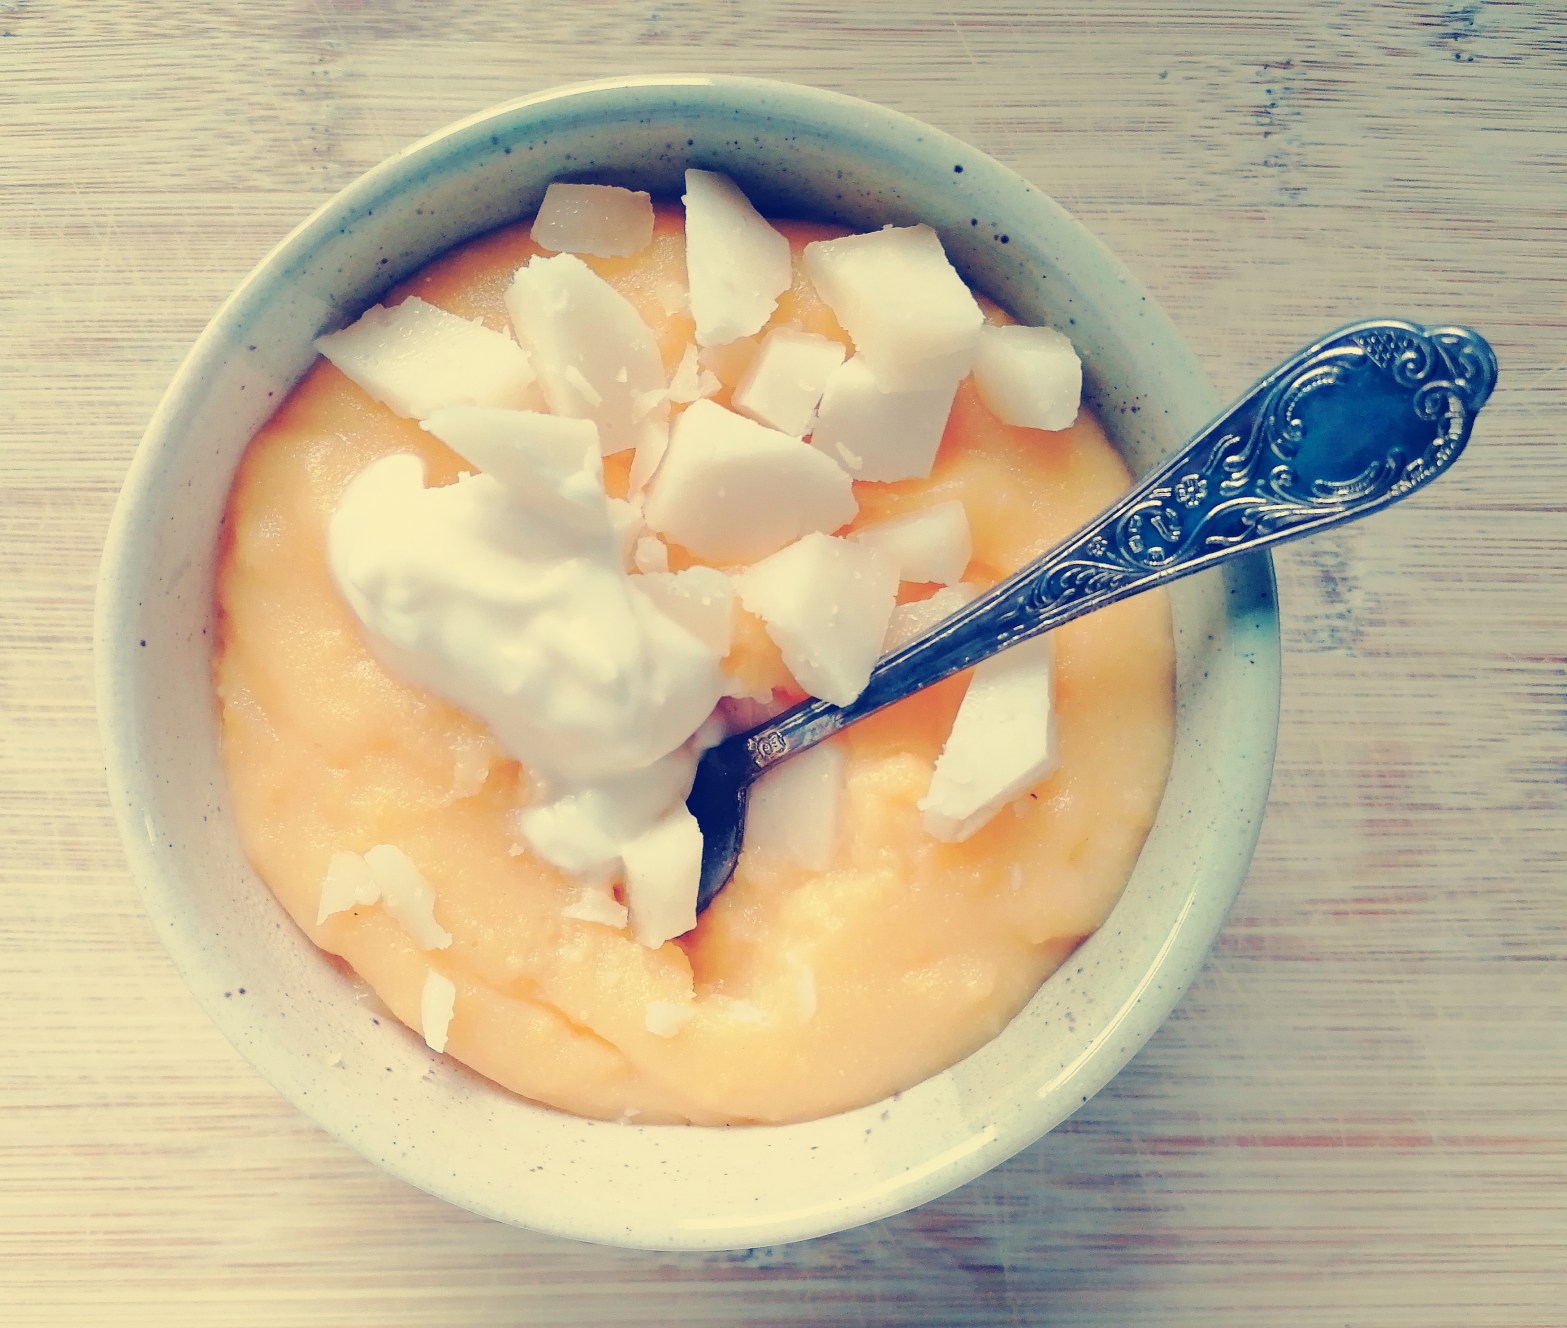
Bryndzové Halušky is the ultimate comfort food: potato dumplings smothered in salty sheep’s cheese and topped with crispy bacon.

Preparation time: 20 minutesCooking time: 10 minutes
Serves: 4Difficulty: Moderate


Ingredients

  • 750g/26.5oz/3 cups of russet potatoes
  • 250g/9oz/2 cups of plain flour
  • 1 egg
  • 1 teaspoon salt
  • 300g/11oz/2 cups of Bryndza or goat’s/sheep’s  cheese
  • 200g/7oz/1 cup of bacon

Make it vegan: You can substitute Bryndza with Vryndza, a soy-based alternative supplied online by Slovakian eco-friendly store Vegana. Alternatively, you can replace it with silken tofu, vegan feta or vegan sour cream. Replace the egg with flax egg (1 tbsp ground flax seed mixed with 3 tbsp water) and replace the bacon with smoked tempeh, smoked tofu or a vegan bacon product like Quorn Vegan Smoky Ham Slices.

Special equipment

  • A spaetzel maker or colander
  • A large saucepan
  • A sieve
  • A large mixing bowl
  • A wooden spoon
  • A spatula or large spoon
  • A hot serving dish

Method

  1. Finely grate the uncooked potato into a large mixing bowl.
  2. Sieve the flour into the bowl and add the salt and egg. Mix everything together thoroughly with a wooden spoon.
  3. Meanwhile, bring a large saucepan of water to the boil.
  4. Use a spaetzel slicer or a colander to drop little Halušky dumplings into the boiling water. Boil the Halušky for a couple of minutes: they’re ready when the dumplings float to surface. Gently remove them from the pan with a skimmer and set them aside.
  5. Meanwhile, dice the bacon. Fry it for a few minutes in a separate frying pan set over a medium heat.
  6. Pour the Bryndza into a hot serving dish and stir in the Halušky. Sprinkle the fried bacon and drippings on top and serve.
  7. Dobrú chuť!

Tips

  • If using a colander to make the Halušky: set the colander over the saucepan and drop the dough into it. Use a wooden spoon to squash the dough through the holes, so it falls straight into the boiling water as tiny dumplings. Alternatively, roll the dough into a long thin sausage and chop it into tiny segments, and drop them into the water.

Background

Home: Slovakia

Pronunciation: [ˈbrɨn.d͡zoveː ˈɦaluʃkɪ] (brihnd-zoev-yuh huh-looosh-kee)

Relatives: Nokedli (Hungary), Gălușcă (Romania), Gnocchi (Italy), Käsespätzle (Germany), Kasnocken (Austria)

History

Slovakia is a landlocked country in central Europe. It’s been populated since at least 5,000 BC, and Western Slavs began to settle the area in the 5th century AD. In the 7th century, they joined a tribal union called Samo’s Empire, which encapsulated parts of modern day Slovakia, Czechia and Austria. In the 9th century, they founded the smaller Principality of Nitra: this was then conquered by the Principality of Moravia, which merged with Nitra to form Great Moravia. The latter eventually disintegrated and its territories were incorporated into the Principality of Hungary, which emerged as a kingdom in 1000 AD. Hungary’s crown eventually merged with the Austrian Empire’s, and in 1867 the two polities were united as the Austro-Hungarian Empire, or Dual Monarchy. The empire was disbanded at the end of World War One, and Slovakia gained its independence as part of Czechoslovakia. Slovakia seceded Czechoslovakia as a totalitarian state during World War II, but after the war ended Czechoslovakia reformed as a state under Soviet influence and control. This control ended in 1989 with Czechoslovakia’s Velvet Revolution, which was followed by the country’s dissolution into the Czech and Slovak republics.

Traditional Slovakian cuisine is full of potatoes, pork, beef, game, dumplings and dairy products. The popularity of such foodstuffs can be traced back to a time when Slovakia’s rural population required hearty, locally produced meals to make it through the region’s cold winters. Slovakian cuisine is also strongly influenced by the country’s neighbors- Czechia, Poland, Austria and Ukraine- whose cuisines have in turn been influenced by Slovakia’s cuisine.

Famous Slovakian foods include a soup called Kapustinica. This is made up of Sauerkraut, meat and mushrooms, and is served up in a hollowed out round bread loaf like Polish Żurek is. Popular meat dishes include Krvavničky, Schnitzel and Chicken Paprikash, and popular sweets include Buchteln, Žemľovka and Trdelnicky.

Bryndzové Halušky is Slovakia’s national dish. Its two primary ingredients are potatoes and Bryndza. The former were first popularized in the 18th century by Archduchess Maria Theresa, who issued written notices to Slovakian villages explaining how to eat potatoes so that villagers knew to only eat the root and to throw away the plant’s poisonous fruit. The archduchess hoped this would encourage more people to plant the crop, since it had a higher yield than many other cereals.

To make Halušky the potatoes are grated and mixed with flour and salt. These thick, soft dumplings are popular across central and eastern Europe, particularly in Slovakia, Czechia, Poland, Ukraine, Hungary and Romania. Once the Halušky are cooked they are mixed with Slovakian Bryndza to make Bryndzové Halušky

Bryndza is Slovakian sheep’s cheese: it’s salty, sharp and crumbly, and is used in quite a few Slovakian dishes. It was introduced to the region in the late 14th century by Wallachian settlers- the word Bryndza derives from a Wallachian word meaning ‘salty.’ 

The modern version of Bryndza was developed by local manufacturers in Stará Turá (western Slovakia) at the end of the 18th century. These manufacturers were able to export Bryndza to other Habsburg polities. Today there are two main varieties of Bryndza in Slovakia: Slovenská Bryndza and Liptovská or Ovčia Bryndza. There is also Bryndza Podhalańska, a Polish variant. The particular variety of Bryndza depends on the proportion of sheep’s cheese used in production.

Halušky Fest is held annually every July in the village of Turecká, central Slovakia. Festival attendees celebrate Bryndzové Halušky by participating in two Halušky-based competitions. The first is a race to make and eat a plate of Halušky quicker than other contestants, and the second is a competition to make the highest quality Halušky.

Bakewell Tart

This classic confection is a delicious combo of frangipane, raspberry jam and butterry shortcrust pastry.

Preparation time: 1 hourCooking time: 1 hour
Difficulty: ModerateServes: 8


Ingredients

For the pastry:

  • 200g/7oz/1 3/4 cups of plain flour
  • 50g/2oz/4 tablespoons of chilled butter
  • 50g/2oz/4 tablespoons of chilled lard
  • A pinch of salt
  • 2-3 tablespoons of ice cold water

For the filling:

  • 2-3 tablespoons of raspberry jam

For the frangipane: 

  • 120g/4oz/1/2 cup of butter
  • 120g/4oz/1/2 cup of caster sugar
  • 230g/8oz/2 cups of ground almonds
  • 2 eggs, lightly beaten
  • 125g/4.5oz/1 cup of cornflour

For the topping:

  • 1 tablespoons of icing sugar (optional)
  • 2 tablespoons of flaked almonds (optional)

Make it vegan: Replace the lard in the pastry with coconut oil or a plant-based shortening, and replace the butter in the pastry and frangipane with vegetable oil, cashew butter or non-dairy margarine. You can replace the egg in the frangipane with 80ml of almond milk or 80ml of whipped aquafaba (chickpea brine.)

Special Equipment

  • A sieve
  • A rolling pin
  • A 20cm baking tin
  • Some baking beans or pie weights
  • Some baking paper

Instructions

  1. Make the pastry: sieve the flour into a large mixing bowl and add the salt. Rub in the fats with your fingertips, until the mixture resembles fine breadcrumbs. Then stir in two tablespoons of water (and if necessary, a tablespoon or two more) until you have a soft, pliable dough. Then pop the pastry in the fridge for half an hour.
  2. Preheat the oven to 170’C/325’F/Gas Mark 3. 
  3. Roll the pastry out into a 25cm circle on a lightly floured work surface. Transfer it to a 20cm pie tin and cut away any overhanging pastry.
  4. Cover the pastry with baking paper and weigh it down with baking beans. Bake for 15 minutes. Then remove the beans and paper and return the pastry to the oven for a further 5 minutes. 
  5. Remove the tin from the oven, then raise the oven temperature to 200°C/400’F/Gas Mark 6.
  6. Spread two or three tablespoons of jam evenly over the base of the pastry.
  7. Meanwhile, melt the butter in a saucepan. Stir in the caster sugar and cook, stirring, for a minute or two. Then remove the pan from the heat and leave the contents to cool for a couple of minutes, before stirring in the cornflour and ground almonds and then stirring in the eggs.
  8. Pour the almond mixture over the pastry and return the tin to the oven. Bake for 40 minutes, rotating occasionally if necessary to ensure that the tart cooks evenly. If you are decorating the tart with flaked almonds, remove the tin from the oven after 20 minutes, sprinkle the flaked almonds over the frangipane, and then return the tart to the oven for a further 20 minutes. After 40 minutes’ total cooking time, the tart should look golden-brown and slightly risen.
  9. If desired, you can sprinkle the finished tart with sieved icing sugar. It can be served warm or cold.
  10. Bon Appetit!

Tips

  • Make sure the butter and lard (or vegan substitutes) used in the pastry are cold. Rub them into the flour as quickly as possible so that you don’t warm them with your hands.
  • When you roll out the pastry, do so on a lightly floured surface so it doesn’t stick. If it seems too sticky and wet, rub in some flour, a little at a time, until it’s less sticky. If it’s too dry, add small amounts of water until it’s a little drier.
  • When the pastry is the right consistency, roll it out with the pin, turning the dough with your other hand after each couple of rolls, so that the dough is rolled out equally in different directions until it’s roughly circular. If it splits, roll it up into a ball and start again.
  • To transfer it to the tart tin, place the rolling pin near the edge of the rolled out pastry and wrap the pastry slowly up around the pin. Then carefully unfold the pastry over the tart tin. Push it neatly into the tin, and cut away any overhanging pastry.
  • If desired, you can use the pastry trimmings for decoration. Re-roll the trimmings out and use some pastry cutters to cut the dough into shapes. Then brush one side of the shapes with a little milk and place them milk side down on top of the tart before putting it in the oven.
  • Rather than using shop bought ground almonds, try grinding unblanched whole almonds in a blender yourself and using these. Doing so will give the frangipane a far more powerful flavour.

Background

Home: England

Pronunciation: /ˌbeɪkwel ˈtɑːt/ (bayk-well taart)

Relatives: Bakewell Pudding, Cherry Bakewell, Gloucester Tart (England), Jésuite (France)
History

The Bakewell Tart is closely associated with Bakewell, a market town in the Derbyshire Dales. The Dales are part of the Peak District, an area of natural beauty in the southern Pennines made up of highland, moorland, plateaus, caverns, woodland, dales and rivers. The Peak District is also dotted with historical sites, including Neolithic monuments, stately halls, industrial architecture, abandoned quarries and Victorian spa towns.

The Peak District

The town of Bakewell is old enough to get a mention in the 11th century Domesday Book; its church dates back to the 9th century. Bakewell began to develop as a market town from the thirteenth century onward, and much later, during the industrial revolution, a cotton mill was established on its outskirts. Because of its mercantile and industrial history Bakewell was able to grow in size and, where necessary, be rebuilt. As a result, it is large enough to be considered the Peak District’s only town.

Wood near Bakewell

One of Bakewell’s claims to fame is its connection to Jane Austen. Austen visited the town before completing Pride and Prejudice and allegedly based ‘Lambton’, the village near Pemberley where Elizabeth and the Gardiners stay whilst holidaying in Derbyshire, on Bakewell. (Pemberley is apparently based on nearby Chatsworth House.) Bakewell is also known for its custom of well dressing. This tradition of decorating wells with flowers and ribbons apparently dates back to pagan times.

Bakewell

The town is also famous for its eponymous tart and pudding. Bakewell Tart and Bakewell Pudding are very similar; both are coated with jam and frangipane. The main difference is that while Bakewell Tart consists of shortcrust pastry, Bakewell Pudding is made of puff pastry. Furthermore while the pudding is served warm and has a soft centre, the tart can be served hot or cold and is pretty solid.

The oldest surviving recipe for Bakewell Pudding dates back to 1837. According to legend it was a culinary accident. A pub cook, intending to make a jam tart, forgot to combine the pastry and egg mixture and ended up pouring the latter over the jam by accident. The resulting pudding was a success and caught on. This might not be quite how it happened, but it is certainly likely that local puddings like the Bakewell Pudding developed from mediaeval tarts. These would had savoury, fruit or custard fillings. One such tart, the Lenten Marchpane, was flavoured with almond paste, and it’s possible that the very almondy Bakewell Pudding developed from this. However, other Derbyshire puddings like the Buxton and Derbyshire puddings are very similar to Bakewell Pudding and it’s not certain that the Bakewell Pudding came first! But of these local puddings it’s certainly the most famous. The Bakewell Tart is believed to have developed from the Bakewell Pudding at some point during the 20th century.

Quetschentaart

This classic dessert from Luxembourg is traditionally eaten in the autumn, when the local Quetschen plums are ripe.

Preparation time: 75 minutesCooking time: 1 hour
Difficulty: EasyServes: 10

Ingredients

For the pastry:

  • A pinch of salt
  • 250g/9oz/2 cups of plain flour
  • 50g/2oz/4 tablespoons of caster sugar
  • 110g/4oz/1/2 cup of cold butter, chopped into cubes
  • 1 egg
  • 2 tablespoons of ice cold water

For the filling:

  • 700g/25oz/4 cups of Quetschen or damson plums
  • 50g/2oz/4 tablespoons of caster sugar
  • Some whipped cream or vanilla custard (optional)

Make it vegan: replace the butter in the pastry with coconut oil, vegetable oil, cashew butter or non-dairy margarine, and replace the egg with a tablespoon of soya or oat milk. Use plant-based cream or non-dairy custard instead of dairy versions.

Special Equipment

  • A sieve
  • A large mixing bowl
  • A wooden spoon
  • A pair of kitchen scissors
  • A rolling pin
  • A 30cm tart tin

Method

  1. Sift the flour into a large mixing bowl, and stir in the salt and 50g of sugar.
  2. Add the butter to the bowl. Working quickly, use your fingers to rub the butter into the flour, so that the mixture resembles breadcrumbs.
  3. Add the egg and ice cold water to the mixture and stir it in with a wooden spoon. If the mixture is too dry to stick together, stir in the remainder of the water.
  4. Form the dough into a ball with your hands. Cover the bowl with a tea towel or some clingfilm and pop it in the fridge for an hour.
  5. Next, preheat the oven to 175’C/350’F/Gas Mark 4.
  6. Roll the pastry out on a lightly floured surface so that it forms a circle, about 35cm in diameter. Transfer it to the tart tin, make sure it ‘s lining the tin evenly, and cut away any overhang with some kitchen scissors.
  7. Cut the plums in half, remove the stones, and then cut them into slices. Lay out the plum slices over the pasty and sprinkle the sugar over them. 
  8. Bake the Quetschentaart for 45 minutes, or until the pastry is golden brown. Turn it in the oven occasionally during cooking so that the pastry is cooked evenly.
  9. Let it cool. Serve with whipped cream or vanilla custard.
  10. Gudden Appetit!

Tips

  • Make sure you use cold butter for the pastry, and rub it in to the flour as quickly as possible so that you don’t warm it up with your hands.
  • Make sure you roll the pastry out on a lightly floured surface so it doesn’t stick. If it seems too sticky and wet, rub in some flour, a little at a time, until it’s less sticky. If it’s too dry, add small amounts of water until it’s a little more pliable.
  • When the pastry is the right consistency, roll it out with the pin, turning the dough with your other hand after each couple of rolls, so that the dough is rolled out equally in different directions until it’s roughly circular. If it splits, roll it up into a ball and start again.
  • To transfer it to the tart tin, place the rolling pin near the edge of the rolled out pastry and wrap the pastry slowly up around the pin. Then carefully unfold the pastry over the tart tin. Push it neatly into the tin, and cut away any overhanging pastry.
  • If desired, you can use the pastry trimmings for decoration. Re-roll the trimmings out and use some pastry cutters to cut the dough into shapes. Then brush one side of the shapes with a little milk and place them milk side down on top of the Quetschentaart before putting it in the oven.

Background

Home: Luxembourg
Pronunciation: (Kvetchen-taarrt)
Relatives: Quetscheflued (Austria), Zwetschgenfladen (Germany and Switzerland)

History

Luxembourg is a small landlocked country in Western Europe, bordered by Germany, France and Belgium. Its history stretches back to 963 AD when Siegfried, Count of the Ardennes, acquired the ancient Lucilinburhuc fortification from St. Maximin’s Abbey, Trier. The fort was situated on top of a rocky promontory, along a road that linked Reims, Arlon and Trier. Easy to defend and ideally located for trade, Lucilinburhuc was refortified and a bustling trading community grew around the castle. ‘Lucilinburhuc‘ became ‘Luxembourg’, and Siegfried’s descendant heirs took the title of Count of Luxembourg.

The county became a fief of the Holy Roman Empire, and after acquiring new territory it was made a duchy in 1353. Later, in the early modern period, Luxembourg, like the Netherlands, was ruled by the Spanish Habsburgs. It was also occupied by France from 1684-1697 and again from 1795 until Napoleon’s defeat in 1815. After this, Luxembourg was elevated to the status of grand duchy, but was made subordinate to the Kingdom of the Netherlands. It was ruled by the latter until 1890 when it became an independent grand duchy.

Luxembourg City
Benh LIEU SONG, Luxembourg City Night Wikimedia Commons, 2010. <https://commons.wikimedia.org/wiki/File:Luxembourg_City_Night_Wikimedia_Commons.jpg&gt; [accessed 21/03/2020] (https://creativecommons.org/licenses/by-sa/3.0/deed.en)

Luxembourg’s historic relationship with France, Belgium and Germany is reflected in its cuisine, which has been influenced by all three as well as by modern immigration from Portugal and Italy. Meat, beans and potatoes are eaten in large quantities, and local river fish like trout are popular. Doughnuts, fruit tarts, pretzels and french cakes are favoured confections; sweet wine is popular, and Luxembourg is a producer of dry white wine, sparkling wine, and ice wine.

The Quetschen plum (‘Zwetschgen‘ in German) is a subspecies of the European plum which grows in Luxembourg and Central Europe. Quetschen are quite similar to the round damson plum, but are more elongated. Quetschen are used to make Austrian and Czech Powidl jam, Silesian Schmootsch jam, German Zwetschgenmännla figurines and Hungarian Szilvás Gombóc dumplings. They’re also used to make brandies like Luxembourgian Quetsch and Austrian, German and Swiss Zwetsch.

They’re very popular in Luxembourg, where annual plum festivals (Quetschefest) are held in early autumn to celebrate the Quetschen coming into season. The Quetschen are served up with regional fruits at these festivals, as are delicacies like Quetschentaart. Quetschentaart is also sold at bakeries across Luxembourg at this time of year; it’s usually eaten with afternoon coffee, and is served up with whipped cream.

Ketty Thull included a recipe for Quetschentaart in her cookbooks, which were published in the 1930s and 40s. Thull’s books, which featured meat and vegetable dishes as well as pastries and desserts like Quetschentaart, are widely considered to be a treasure trove of authentic Luxembourgian cuisine. They’re still widely read, and as a result, Thull’s version of Quetschentaart is still popular today.

Shakshouka

Shakshouka is popular across the Eastern Mediterranean, Arabian Peninsula and North Africa. This Israeli version is perfect for breakfast, brunch or lunch!

Preparation Time: 5 minutesCooking Time: 20-25 minutes
Difficulty: ModerateServes: 4 (As a snack/light meal)

Ingredients

  • 2 tablespoons of olive oil
  • 400g/14oz/2 cups of fresh tomatoes, chopped (use a mix of salad and cherry tomatoes if possible)
  • A heaped teaspoon of paprika
  • A pinch of salt
  • One or two chili peppers, sliced into rings
  • 4 eggs
  • A green pepper, chopped (optional)
  • Two cloves of garlic, minced (optional)
  • A heaped teaspoon of cumin (optional)
  • Pitta bread or Challah (optional, to serve)

Make it vegan: Israel’s second city, Tel Aviv, is considered by many to be the vegan capital of the world, so lots of vegan options have been developed for Shakshouka!

You just need to omit the eggs. Try replacing them with slices of silken tofu or dollops of creamed corn. Poach these in the Shakshouka as you would the eggs (steps 5-6). Alternatively, you can substitute the eggs with dollops of cashew ricotta or vegan cream cheese: these don’t need to be poached and can be spooned onto the finished Shakshouka.

For a little extra protein, add some chickpeas to the Shakshouka. The best time to do this is just after you’ve crushed the tomatoes (step 4.) Drain a tin of chickpeas, stir them in, and continue onto step 5.

Special equipment

  • A skillet, tagine or large frying pan with lid
  • A spatula

Instructions

  1. Add the oil to the skillet and set it over a high heat.
  2. If you’re using green peppers, add these to the pan first and sauté them, stirring occasionally, for five minutes.
  3. Turn the hob down to medium and add the chili pepper(s), chopped tomatoes, salt and paprika, along with the garlic and cumin (if using.) Sauté the ingredients for five minutes, stirring occasionally.
  4. Crush the contents of the skillet with a spatula, so that the tomatoes begin to release their liquid. Continue to cook for a further 5-10 minutes, stirring occasionally. Crush the contents of the skillet once or twice more with the spatula while it’s cooking, so that the tomatoes continue to release juice. If the liquid dries up and you’re worried about the Shakshouka burning, it’s time to move onto step 5.
  5. Turn the heat down low. Make 4 dimples in the Shakshouka and crack an egg into each one.
  6. Cover the pan. Cook the Shakshouka for a further 4-6 minutes, or until the eggs are cooked. Don’t stir.
  7. Serve immediately: you can eat it straight from the pan.
  8. B’tayavon! (בתיאבון

Tips

  • For best results, use a mix of different breeds of fresh tomato

Background

Home: Israel, Morocco, Yemen

Pronunciation /ʃækˈʃu kə/ (shack-shoe-kah)

Relatives: Şakşuka (Turkey), Menemen (Turkey), Uova in Purgatorio (Italy), Lecsó (Hungary), Galayet Bandora (Jordan), Matbukha (Maghreb)

History

Shakshouka is eaten across the Maghreb, Levant and Arabian Peninsula. It’s a popular dish in Algeria, Egypt, Libya, Morocco, Saudi Arabia, Tunisia and Yemen, and is particularly associated with Israel.

Because Shakshouka is popular in so many different countries, we don’t know the dish’s exact origins.

We do know that after the tomato was introduced to Eurasia, various forms of tomato stew became popular in Anatolia, the Levant, Maghreb, Arabian Peninsula and Horn of Africa. Many of these tomato stews were adapted from older regional stews. We aren’t exactly sure when the tomato was introduced to these areas. The fruit was brought to Europe from South America by Spanish Conquistadors and/or Jesuits in the late 15th or early 16th centuries, and by 1548, the pomodoro had been introduced to Italy. But it didn’t become a popular food there for centuries, and it allegedly wasn’t introduced to the Levant until the early 19th century! It was, however, eaten from the get-go in Spain, where it was often used in place of aubergines. So it seems unlikely that tomatoes would have been completely unknown in the western Maghreb until the 1800s. Whenever tomatoes reached North Africa and the Eastern Mediterranean, they eventually became a popular ingredient in regional meat and vegetable stews.

One or several of these stews inspired modern Shakshouka. The Ottoman Empire’s Şakşuka (a dish of sauteed vegetables and minced liver which later incorporated tomatoes) is likely to have been an inspiration. Modern Shahshouka‘s origins have also been attributed to Yemen, Morocco, and Tunisia. Not only is Shakshouka still popular in all three countries today, but the word Shakshouka is itself an Arabic word of Berber (western Maghrebi) origin, meaning ‘all mixed up’. At its height the Ottoman Empire stretched as far into the Maghreb as Algiers, so it’s possible that Arab Shakshouka inspired Ottoman Şakşuka, or vice versa. So Shakshouka likely has Yemeni, North African and Turkish roots.

Modern Yemeni cuisine is an interesting amalgamation of Arab, Ottoman and Mughal cuisines. Yemen’s national dish is Saltah, a meat stew flavoured with fenugreek and a local hot sauce, Zhug: other popular foods include chili peppers, lamb, honey and milk. Yemeni Shakshouka has a higher ratio of egg to tomato than Israeli or Maghrebi Shakshouka, and it tends to contain lots of onion and Zhug.

Sana’a, Yemen
Rod Waddington, Sana’a, Yemen (14667934933), 2011. <https://commons.wikimedia.org/wiki/File:Sana%27a,_Yemen_(14667934933).jpg> [accessed 17/03/2020] (https://creativecommons.org/licenses/by-sa/2.0/deed.en)

Moroccan cuisine has Andalusian, Arab and Berber roots. Maghrebi green tea is an important part of daily life. Couscous and tagines are staple foods, and are flavoured with dried apricots, preserved lemons, and a range of herbs and spices. Moroccan Shakshouka is served in a tagine: it’s lower on eggs than Yemeni Shakshouka, doesn’t tend to contain onions, and is often garnished with parsley. Shakshouka from elsewhere in the Maghreb varies by country, but in general tends to contain peppers, onions, and copious amounts of spice.

Tagines at a Moroccan Souk
Jafri Ali, Tajines in a pottery shop in Morocco, 2014. <https://commons.wikimedia.org/wiki/File:Tajines_in_a_pottery_shop_in_Morocco.jpg&gt; [accessed 17/03/2020] (https://creativecommons.org/licenses/by-sa/4.0/deed.en)

Israeli cuisine is a bit of a melting pot. The ancient Israelites’ ‘Seven Species’- olives, figs, dates, pomegranates, wheat, barley and grapes- remain an important component of the country’s cuisine. Levantine dishes from the surrounding region (Egypt, Jordan, Lebanon, Palestine and Syria) are also popular, as are foods introduced by Jewish diasporas from the late nineteenth century onward.

Israeli Hummus
Reutc, Hummuswithpinenuts, 2006. <https://commons.wikimedia.org/wiki/File:Hummuswithpinenuts.jpg&gt; [accessed 17/03/2020] (https://creativecommons.org/licenses/by/2.5/deed.en)

From Israel’s foundation in 1948 until around 1970, Sephardi and Mizrahi Jews left Arab and Turkic lands en masse for the new country. Shakshouka was likely introduced by Tunisian Jews, whose Maghrebi Shakshouka was known to be particularly spicy. The new immigrants tended to suffer from financial hardship, so they ate quick, simple and cheap Shakshouka often. As such the dish quickly become popular across Israel. Israeli Shakshouka contains lots of tomatoes and some spice, and sometimes contains extra ingredients like onion, garlic and peppers. Vegan versions are popular, as are newer recipes like spinach and lemon Shakshouka.

Jerusalem
תומר פלד, העיר העתיקה בירושלים בלבן, 2014.
<https://commons.wikimedia.org/wiki/File:%D7%94%D7%A2%D7%99%D7%A8_%D7%94%D7%A2%D7%AA%D7%99%D7%A7%D7%94_%D7%91%D7%99%D7%A8%D7%95%D7%A9%D7%9C%D7%99%D7%9D_%D7%91%D7%9C%D7%91%D7%9F.jpg&gt; [accessed 17/03/2020] (https://creativecommons.org/licenses/by-sa/3.0/deed.en)

Salzburger Nockerl

This light and fluffy dessert really melts in the mouth!

Preparation time: 15 minutesCooking time: 20 minutes
Serves: 3Difficulty: Moderate

Ingredients

  • 5 eggs, separated
  • Pinch of salt
  • A dash of lemon juice
  • 3 tablespoons of granulated sugar
  • 1 teaspoon of vanilla sugar
  • 1 tablespoons of plain flour
  • 2 tablespoons of icing sugar
  • Raspberry sauce (optional)

Special equipment

  • A whisk, preferably an electric whisk
  • A baking dish
  • A sieve

Method

  1. Preheat the oven to 180’C/350’F/Gas Mark 4.
  2. Whisk the egg whites, salt and lemon juice in a clean glass or copper mixing bow. Continue whisking until the egg whites are thick and foamy.
  3. Add the granulated and vanilla sugars to the egg white mixture. Whisk until stiff peaks form.
  4. In a separate bowl, stir the flour and egg yolks together.
  5. Use a spatula or large spoon to very gently fold the egg yolk mixture into the egg white mixture, making sure you don’t over mix.
  6. Spoon the mixture into a baking dish. Use a large serving spoon to form the Nockerl into large dumplings.
  7. Bake the Nockerl in the oven for about 20 minutes, or until golden.
  8. Sieve some icing sugar onto the baked Nockerl. Then drizzle with raspberry sauce, and serve hot.
  9. An guadn!

Tips

  • If desired, you can drizzle the Nockerl in raspberry sauce when you serve it. Alternatively you can pour some raspberry sauce onto the baking dish and spoon the Nockerl over it before baking.
  • Make sure the bowl you whip the egg whites in is glass or copper (not plastic) and has been cleaned thoroughly- egg whites can be finicky and if even a hint of grease gets into the mixture while it’s being whipped, they will collapse.

Background

Home: Austria
Pronounciation: (Soizburga Noggal)
Relatives: Soufflé (France), Floating Island (France)
History

Salzburg (‘Salt Fortress’) is the capital city of the State of Salzburg in western Austria. It’s situated in the Central Eastern Alps: its terrain ranges from hilly to outright mountainous. The city is situated on the Salzach (‘Salt River’), which was historically used to transport (you guessed it!) salt from the nearby salt mine. The mine, Salzbergwerk Dürrnberg, is dug under the Dürrnberg plateau near the village of Hallein. Salt had been mined at Dürrnberg for at least 7,000 years. Researchers have found organic evidence that suggests ancient Celtic tribes mined salt here during the Iron Age, and there’s evidence of human settlement dating back to the Neolithic Age.

Once a Roman municipium, by the 14th century Salzburg was a prince-bishopric and a territory of the Holy Roman Empire. The city greatly benefited from the local salt trade: it was able to levy tolls on passing salt barges, and excelled as a trading community. The celebrated 16th century prince-archbishop Wolf Dietrich von Raitenau used the proceeds of the salt trade to enhance the city’s architecture, which would, over the coming two centuries, become famed for its Baroque style. As a result, the historic centre of Salzburg is now a UNESCO World Heritage Site. The city is also famous for being the birthplace of Mozart.

A lot of Austrian sweets are intricate cakes, like the Esterhazy Torte, Dobostorte and Sachertorte. Strudels, like the Apfelstrudel and Weichselstrudel, are popular deserts. Other desserts include the Danish Pastry (originally brought to Denmark by Viennese bakers) and the Vanillekipferl. Salzburg itself is the home of both the Salzburger Nockerl and Mozartkugel (Mozart Ball.) The latter is a ball of pistachio marzipan, wrapped in nougat and coated in dark chocolate. It was invented in the late 19th century by a Salzburger confectioner, Paul Fürst, who named his creation in honour of Mozart.

The exact origins of Salzburger Nockerl are a little more hazy. Legend has it that the dessert was invented in the early 17th century by Salome Alt, the common-law wife of prince-bishop von Raitenau. Alt, whose grandfather had been mayor of Salzburg, lived with von Raitenau at his Salzburg Residenz for long enough to have 15 or 16 children with him. The Nockerl is probably derived from the French Soufflé. It’s even been suggested that Napoleon himself brought the Salzburger Nockerl to Austria, though this seems a little fanciful.

The dish remains popular and integral to Salzburger culture, and can be ordered in every restaurant in Salzburg. In 1938 the Austrian composer Fred Raymond went so far as to compose an operetta about it, Saison in Salzburg – Salzburger Nockerln, in which he described the Nockerl as ‘Süß wie die Liebe und zart wie ein Kuss‘- as sweet as love and tender as a kiss.

The Nockerl is generally shaped into three dumplings which are dusted with icing sugar. This presentation represents the snowy peaks of Gaisberg, Mönchsberg and Kapuzinerberg, the three hills which surround the historic centre of Salzburg. Sometimes an extra ‘hill’ is added, which represents Untersberg.


Salzburg Old Town
Taxiarchos228, Salzburg – Panorama (nachts)2, 2011 <https://commons.wikimedia.org/wiki/File:Salzburg_-_Panorama_(nachts)2.jpg&gt; [accessed 12/03/2020] (http://artlibre.org/licence/lal/en/)

Masala Chai

Preparing Masala Chai (‘mixed-spice tea’) takes more work than rustling up a quick cup of tea- but this beautifully aromatic, warming drink is well worth the extra effort.

Preparation time: 5 minutesCooking time: 20 minutes
Infusion time: At least 20 minutes Difficulty: Easy
Serves: 3 to 4 small cups

Ingredients

  • 2 cardamom pods
  • 4 cloves
  • 2 black peppercorns
  • A thick 4 cm slice of fresh ginger, or a teaspoon of ground ginger
  • A whole nutmeg, or one teaspoon of ground nutmeg
  • A cinnamon stick, or one teaspoon of ground cinnamon
  • 500ml/5dl/just under a pint/2 cups of milk
  • 500ml/5dl/just under a pint/2 cups of water
  • 2 tablespoons of sugar
  • 2 tablespoons of black tea leaves, or 2 teabags (preferably Assam)

Make it vegan: substitute the milk with soya, almond or oat milk

Special equipment

  • A large, heavy bottomed saucepan with a lid
  • A pestle and mortar
  • A tea strainer
  • A warmed teapot

Method

  1. Prepare the spices: crush the cardamoms, cloves and peppercorns using a pestle and mortar. If you don’t have a pestle and mortar, try to gently break the cloves and peppercorns apart with your fingers and split the cardamom pods open with a knife. If using fresh ginger, cut it into thin slices and if using a whole nutmeg, grate it. You only need about half a teaspoon of grated nutmeg.
  2. Add the cardamoms, cloves, peppercorns, ginger, nutmeg and cinnamon to a large, heavy bottomed saucepan along with the milk and water.
  3. Place the pan over a medium heat and bring its contents to a boil. Stir the liquid before placing a lid on the pan and turning off the heat. Leave the spices, milk and water to infuse for at least 20 minutes. If you have time, leave them for a few hours- the longer the better!
  4. When ready, turn the hob back on and bring the contents of the pan to a boil before, once again, turning off the heat. Add the tea and sugar to the pan and stir before replacing the lid. Allow the Chai to steep for five minutes.
  5. Carefully strain the Chai into cups using a tea strainer. Alternatively, pour the Chai into a warmed teapot, then strain it into cups when ready to serve.
  6. Bon Appetit!

Tips

  • The spices listed here are just some of the spices you can use to make Masala Chai. You can alter how much of each spice you use according to taste, or substitute these spices with others of your choice. Other commonly used spices and flavourings include bay leaves, star anise, fennel, black cardamom, saffron, chili, coriander, cumin or liquorice root: for sweeter flavours, try vanilla, honey, rose petals or almonds. To make Noon Chai, use green tea leaves instead of black.
  • If you are a fan of Masala Chai, you can make the spice blend in advance. Prepare ten times as much of each spice as you would use to make one serving of Masala Chai. Pour the spices into a large, airtight jar, close the lid firmly, and shake the jar until the spices are thoroughly combined. Then just use a few teaspoons of the spice blend when you want to make some Chai.
  • For best results leave the spices, milk and water to infuse in the pan for as long as possible, preferably for at least a couple of hours. And try to avoid pre-ground spices if you can- grated whole nutmeg and sliced fresh ginger give much better results than their pre-ground counterparts!

Background

Home: India

Pronunciation: (mass-allah-chai)

Relatives: Noon Chai (Kashmir), Hong Kong Tea (Hong Kong), Teh Tarik (South East Asia)

History

The history of Masala Chai stretches back thousands of years- perhaps as far back as 9,000 years ago! But Masala Chai didn’t contain tea and wasn’t drunk recreationally until relatively recently. Historically, it was exclusively made using various spices and was taken for medicinal purposes. One legend states that the healing properties ascribed to the spice blends which now flavour Masala Chai were discovered long ago by a Buddhist traveler. According to another story, they were discovered by the 7th century CE Pushyabhuti king Harshavardhana. The Masala spices are also associated with the Ayerveda system of Indian medicine. Meaning ‘The Science of Life’ in Sanskrit, Ayerveda has been around since the era of the vast, ancient Indus Valley Civilization, which was contemporaneous to the ancient Egyptian and Mesopotamian civilizations. The oldest known Ayurveda text dates to the 6th century BCE: such ancient texts taught medical practices such as surgical techniques and herbal remedies. The Masala spice blend is one such remedy named in the Ayervedic texts and has been used as an Ayervedic medicine in Ayurveda for a very long time.

Tea is a comparatively recent addition to Masala Chai. A commonly used tea is Assam tea. This tea is named after its place of origin, the north eastern Indian state of Assam, which is also home to several other varieties of black, green and white tea. According to the Bengal Kali Purana text, the historical region that is now Assam was once ruled by the Naraka dynasty, the last of whom was slain by Krishna, the god of love and tenderness. After the Naraka era Assam was incorporated into the Gupta Empire (4th-6th century CE) before later forming much of the Kamarupa State (4th-13th century CE), which later split into the Ahom Kingdom (13th-19th century CE) and the neighbouring Chutiya and Dimasa kingdoms. The region was subsequently invaded by the Mughal and Burmese Empires before being occupied by the British from the late 18th century. Assam was formally annexed in 1838.

Tea was becoming phenomenally popular in Britain by this point. As such, the British wanted to move in on the tea trade, which was then the domain of Imperial China. After waging the destructive Opium Wars against China Britain began to dominate Asian tea exports. Assam’s Camellia Sinensis plant was cultivated for tea and exported but black tea, which was very expensive, wasn’t popular in India itself. As a result, the (British) Indian Tea Association tried to encourage its consumption in India, in the British style- that is, with milk and some sugar. Indian Chaiwalas (Chai vendors) got around the extortionate costs of the black tea peddled by the ITA by using only small amounts of tea, which they flavoured with copious amounts of milk, sugar and traditional spice mixes.

Tea garden in Assam
Kaushik s, TeaGardenOfAssam, 2007
https://commons.wikimedia.org/wiki/File:TeaGardenOfAssam.jpg [accessed 09/03/2020] (commons license: https://creativecommons.org/licenses/by-sa/4.0/legalcode)

Modern Masala Chai– a mix of black tea, milk, sugar and ancient spice blends-was born. Over the twentieth century the beverage has grown and grown in popularity, both in India and worldwide.

Pastéis de Nata

Preparation time: 15 minutesCooking time: 20 minutes
Difficulty: EasyServes: 12

Ingredients

  • A little butter, for greasing
  • 160g/5 1/2 oz/half a pack of puff pastry
  • 400ml/4dl/3/4 pt/1 2/3 cups of semi skimmed milk
  • 200g/7oz/1 cup of sugar
  • 30g/1oz/3 heaped tablespoons of plain flour
  • 6 egg yolks
  • 1 lemon, zest only
  •  1 cinnamon stick
  • A little extra flour, for rolling the pastry

Special Equipment

  • A whisk
  • A rolling pin
  • A wooden spoon
  • A large saucepan
  • A 12 hole muffin tin
  • A pastry brush

Method

  1. Prepare the muffin tin by gently brushing butter over each muffin well.
  2. Pour the flour, sugar and milk into a large saucepan and whisk them together until uniform.
  3. Place the pan on the hob over a medium heat, and continue to whisk its contents. After a few minutes’ whisking, the milk mixture should be thickened and smooth.
  4. Add the zest and cinnamon stick to the pan and stir them in with a wooden spoon. Remove the pan from the heat and leave the mixture to cool down a little.
  5. Preheat the oven to 250’C/480’F/Gas Mark 9.
  6. When the mixture is lukewarm, remove the cinnamon stick. Then, whisk in the egg yolks.
  7. Roll the pastry out on a lightly floured surface, and cut it into 12 squares. Use your fingers to press these into the muffin wells, pulling the pastry up to the edges so that entire wells are covered.
  8. Then pour the custard mixture over the pastries, pouring as much into each well as you can. Put the muffin tin in the oven and bake for about 12 minutes, turning halfway through if necessary. You can remove them from the oven when the pastry seems lightly browned and the custard is slightly caramelized and wobbles gently when the tin is shaken. If it seems too liquidy and leaky, bake for another few minutes.
  9. If desired, dust the Pastéis with powdered cinnamon and sugar.
  10. Bom apetite!

Tips

  • To get the lemon zest, gently grate the lemon peel onto a plate. Try to avoid the white pith as much as possible.
  • Accompany the Pastéis with a good Portuguese wine, coffee or cherry liqueur

Background

Home: Portugal

Pronunciation: /pɐʃˈtɛɫ dɨ ˈnatɐ/ (pastays dei natta) (Pasteis is plural-a singular pastry is a plural)

Relatives: Egg Custard (United Kingdom), Egg Tart (Hong Kong), Flans Pâtissiers (France), Alivenci (Romania), Melktart (South Africa)

History

Pastéis de Nata were created and eaten by monks at the Mosteiro dos Jerónimos in Belém, a parish in Lisbon. We don’t know exactly when the Pastéis were first made, but it was certainly before the 18th century. In this era, religious houses needed egg whites to starch their religious habits. As a result, monasteries and convents were left with a surplus of egg yolks, which they used to bake cakes and pastries. The recipe developed by the monks at Belém made use of other ingredients readily available in Lisbon: locally grown gallego lemons, and cinnamon, brought over by Portuguese traders from Sri Lanka.

Their monastic lifestyle abruptly came to an end in the early nineteenth century. The Portuguese Liberal Revolution of 1820 sought judicial reform, and hoped to curtail the power of the nobility and church. As a result, the liberal constitution adopted in 1821 provided for the suppression of the Inquisition and the selling of church lands. Hoping to avoid the loss of their monastery, monks from the Mosteiro dos Jerónimos began selling the Pastéis for revenue, as a way of keeping themselves afloat.

Mosteiro dos Jerónimos, Lisbon
Jean-Pierre Dalbéra, Léglise Sainte-Marie et le monastère des Hiéronymites (Lisbonne), 2006 <https://commons.wikimedia.org/wiki/File:L%C3%A9glise_Sainte-Marie_et_le_monast%C3%A8re_des_Hi%C3%A9ronymites_(Lisbonne)_(1454116766).jpg> [accessed 07/03/2020] (commons license: https://creativecommons.org/licenses/by-sa/4.0/legalcode)

By 1834 however, the monastery’s closure was unavoidable. The monks sold their recipe to a local sugar refinery, whose owners founded the Fábrica de Pastéis de Belém in 1837. The Fábrica still does a roaring trade to this day, and the nearby Mosteiro is now a major tourist attraction and World Heritage Site.

Because the Pastéis hail from Belém, they are often known as Pastéis de Belém instead of Pastéis de Nata (which means cream pastries.) But such is their popularity that there are regional varieties of Pastéis de Belém all over Portugal, complete with local tweaks and changes.

Japanese cuisine was heavily influenced by Portuguese cuisine because of the presence of Portuguese traders in Japan in the early modern era. As a result, Pastéis de Nata are popular in Japan, South Korea, and surrounding countries: local varieties include Pastéis infused with green tea.

Mămăligă

Mămăligă is the national dish of Moldova: much-loved, and steeped in tradition. The dish is simple and quick to make, and is hearty, very nutritious and extremely versatile.

Preparation Time: 5 minutesCooking Time: 10 minutes
Difficulty: EasyServes: 4

Ingredients

  • 300g/10.5oz/2 cups of cornmeal
  • 940ml/1 1/2 pt/4 cups of water
  • 1 tablespoon salt
  • Sour cream (optional)
  • Sheep’s cheese (optional)

Make it vegan: the Mămăligă on its own is already vegan but a lot of its traditional accompaniments aren’t. Luckily there are some great online recipes for vegan sour cream, sheep’s cheese and Paprikash which can be served with Mămăligă instead.

Special Equipment

  • A metal cooking pot
  • A wooden spoon
  • A sharp knife or cheese wire

Method

  1. Pour the water into the metal pot and place it over a medium-high temperature. Bring it to a gentle simmer and add the salt.
  2. Slowly pour the cornmeal into the simmering water while stirring. Keep stirring for a few minutes, until there are no lumps and the mixture is a little thickened.
  3. Turn the heat down as low as it will go and cover the pot. Cook for another ten minutes, stirring occasionally and adding water if it looks like it might burn.
  4. When the mixture comes together and comes away from the sides, take it off the heat.
  5. The Mămăligă can be poured into bowls straight away while it’s hot, and eaten like porridge. Alternatively, pour it onto a wooden board and shape it into a flat circle, and allow it to dry and harden for a couple of minutes. Then use cheese wire or a very fine knife to cut it into slices.
  6. Serve the Mămăligă with sour cream and sheep’s cheese if desired, or as a side with a meat dish like Paprikash.
  7. Poftă bună!

Tips

  • Serve with sour cream and/or Telemea (sheep’s cheese)
  • You can eat Mămăligă straight off the stove, like porridge. Or you can leave it to cool down and harden, in which case it can be cut and eaten like bread

Background

Pronunciation: /məməˈliɡə/ (mamma-leega)

Home: Moldova, Romania

Relatives: Polenta (Italy), Bulz (Romania), Kačamak (Bulgaria)

Mămăligă is the national dish of both Moldova and Romania. It’s integral to the two counties’ culinary identities, and is also popular in Eastern Galicia and parts of the Caucasus- as well as internationally, in places exposed to the dish by Bessarabian expats.

Mămăligă is actually a relatively new dish. In Roman times, mullet flour porridge was popular in Bessarabia, and this remained popular for centuries. Corn (maize) wouldn’t be introduced to Europe until the 16th century, when Hernan Cortez brought it back to Spain from Mexico. Corn arrived in Bessarabia via Venice nearly a century later, during the reign of Constantin Duca. Corn quickly became integral to the Principality of Moldavia’s cuisine. Its availability helped combat regional famines in the 17th and 18th centuries, especially since the Ottoman Empire didn’t tax it, and eventually corn Mămăligă replaced millet flour porridge as the staple food of the region. As a pareve food, durable enough to be made a day in advance, Mămăligă became particularly popular with Jewish Moldovans and Romanians. It’s regional prominence was presumably well known by 1897, when Bram Stoker’s Dracula was published. In the novel, solicitor Jonathan Harker visits Count Dracula in Transylvania, and is served ‘a sort of porridge of maize flour which they said was Mămăligă’, which is complimented with paprika and impletata. (Stoker never actually visited Transylvania or the surrounding region, but he had researched the area’s folklore and culture.)

Mămăligă remains a staple food in Moldova and Romania. It comes in many varieties: it can be eaten on its own, flavoured with cheese and spices, or served a side dish to a main, in place of bread or rice. It can be served as a ‘cake’, or as porridge, or in balls. It’s so cherished and so versatile that it’s popular across Moldovan and Romanian society: it’s traditionally a cheap, unpretentious peasant food, hence the saying, ‘he’s so poor he can’t even afford Mămăligă!’, but it’s also served to tourists and locals alike in Chisinau and Bucharest’s most upscale restaurants. So give it a try- it’s very good for you! Aside from water and a little salt the only ingredient is corn, which is very nutrient rich. The only rule is- eat the Mămăligă when it’s hot!

Spaghetti Aglio e Olio

This quintessential Neapolitan dish is simple and speedy, but deliciously fresh and full of flavour.

Preparation Time: 5 minutesCooking Time: 15 minutes
Difficulty: ModerateServes: 4

Ingredients

  • 3 cloves of garlic
  • 1 red chilli
  • 100ml/1dl/1/5 of a pint/just under half a cup of extra virgin olive oil
  • Pinch of salt and pepper
  • 400g/14oz/large handful of spaghetti
  • Handful of fresh chopped parsley (optional)
  • Pinch of finely grated parmesan, or even better, pecorino romano (optional)

Make it vegan: you can substitute parmesan with a homemade vegan substitute like this one, which tastes just as good as the real thing!

Special equipment

  • A saucepan
  • A frying pan
  • A spaghetti spoon

Instructions

  1. Peel the garlic and chop it finely. Cut the chilli into thick chunks, and if you aren’t a fan of spice, remove the seeds.
  2. Meanwhile bring a saucepan of water to the boil and cook the spaghetti, stirring occasionally, for about 8 minutes- or until it is al dente. Then remove it from the heat and drain, but reserve the cooking water.
  3. While the spaghetti is cooking, pour the oil into a frying pan and set it over a low-medium heat. Add the garlic, chilli, salt and pepper and saute them gently for two or three minutes, or until the garlic is very light brown and fragrant. This will bring out the garlicky flavour, but keep a close eye on the pan and stir it regularly- if the garlic becomes too brown it will begin to taste bitter and burnt.
  4. When the garlic and spaghetti are both ready, pour the spaghetti and a couple of tablespoons of the cooking water into the garlic and oil. Use the spaghetti spoon to stir everything together, so that the oil, garlic and chilli are incorporated into the spaghetti. 
  5. If desired, sprinkle some chopped parsley and finely grated hard Italian cheese over the spaghetti.
  6. Buon appetito! 

Tips

  • Keep an eye on the garlic while it’s cooking. Only saute it for a couple of minutes at a moderate temperature, and stir it regularly while you do so. Once it starts to go the lightest shade of brown, remove the pan from the heat. If it’s cooked even for a few seconds too long, or cooked at too high a temperature, it will taste bitter and burnt.
  • Serve with a dry white wine or an Italian red
This image has an empty alt attribute; its file name is img_20191009_145058-2.jpg

Background

Home: Naples, Campania, Italy

Pronounciation: /spəˈɡeti ˈaʎʎo e ˈɔːljo/ (spaghetti ahleoh ey ohlyeoh) (Aglio is pretty hard to pronounce for non-Italians)

Relatives: Linguine Vongole (Naples), Vermicelli alla Borbonica (Italy), Pasta c’Anciova (Sicily)

History

Spaghetti Aglio e Olio is Neapolitan in origin (although it is also sometimes attributed to the eastern Abruzzo region.) Because Aglio e Olio originated as cucina rustica (peasant food), its origins are pretty murky. It was probably eaten by Campanian farmers who couldn’t quite afford to make the local specialty, Linguine Vongole. Forgoing clams and white wine, they flavoured their pasta with just olive oil. This was locally produced on Campania’s olive groves, and thus was readily available and cheap. Later, Campanians began to add garlic and red chillis to the recipe.

The first cookbook to feature a recipe for Aglio e Olio was Ippolito Cavalcanti’s 1837 book, Cucina Teorico Pratica, a compendium of Neapolitan and French dishes. Cavalcanti’s recipe called for long pasta, accompanied by garlic fried in the highest quality oil available. He titled the dish Uermiculi Aglio e Uoglie, as he used vermicelli in lieu of spaghetti. In her 1965 cookbook La Cucina Napoletana, Jeanne Caròla Francesconi suggested the use of linguine instead.

Today, Spaghetti Aglio e Olio is popular throughout Italy, particularly in the south. It’s often rustled up as a quick lunch or late night meal.

Tufahije

This quick and easy, make ahead Bosnian dessert tastes as impressive as it looks!

Preparation Time: 20 minutesCooking Time: 15 minutes
Refrigeration Time: 1 hour+Difficulty: Easy
Serves: 8

Ingredients

  • 8 Granny Smith (or other tart) apples
  • 150g/5oz/1 1/4 cups of chopped walnuts
  • 3 tablespoons of honey
  • 270ml/3 dl/1/2 pt/just over a cup of whipped cream, or a can of squirty cream
  • 500g/17.5oz/2 1/2 cups of sugar
  • 500ml/5dl/1 pt/2 cups of water
  • 1 tablespoon lemon juice
  • 1 teaspoon vanilla extract

Make it vegan: you can replace the honey with maple syrup, or use a vegan honey. You can also replace the cream with a plant based whipping cream of squirty cream.

Special equipment

  • A blender
  • A saucepan
  • A piping bag and nozzle for the whipped cream, if not using a can of squirty cream

Instructions

  1. Blend two thirds of the walnuts in a food processor until they’re ground. 
  2. Add a fifth of a cup of cream and 2 tablespoons of honey to the ground walnuts and blend together.
  3. Peel the apples. Use a knife to carefully remove the cores- but keep the apples whole, and don’t completely cut through to the bottom.
  4. Pour the water, lemon, vanilla and sugar into a saucepan and place it on the hob over a high heat. Stir the contents thoroughly until the sugar is dissolved, and bring to the boil.
  5. Add the apples to the saucepan and cook them for ten to fifteen minutes, until they are a little softened. Don’t overcook them.
  6. ‌Remove the apples and place them on a serving dish or dishes. Leave them to cool, and add the remainder of the honey to the syrup. Simmer it for a few more minutes, until thickened. 
  7. Ladle the nut mixture into the apple hollows. 
  8. Then ladle the syrup over the apples. Pipe some of the remaining cream onto each apple, then sprinkle the remaining chopped walnuts on top.  
  9. Refrigerate until ready to serve.
  10. Prijatno!


Tips

  • Make sure you don’t cut all the way through the apples when you are coring them, or the nut mixture will spill out. The apple should be like a hollowed out cup. 
  • Tufahije is traditionally served cold, in glass bowls, with hot cups of coffee.

Background

Home: Bosnia and Herzegovina, Serbia, North Macedonia

Relatives: Dolmeh Sib (Iran), Pecheni Yabalki (Bulgaria). There are also Balkan variations of Tufahije with a cherry topping instead of walnuts, with apricot flavoured whipped cream, and with a coffee, sour cream and whipped egg white filling instead of the walnut and cream mixture. 

History

Bosnia has a rich musical, literary, cinematic and architectural heritage, which reflect its extensive Islamic and Central European influences. The country also boasts beautifully dramatic mountains, and is today known for its bridges, museums, and memorials to its tragic recent history. 

When the Roman Empire was divided into East and West in the 4th century AD, the regions of Dalmatia and Pannonia (parts of which constitute modern Bosnia) were administered by the Western Roman Empire. They were then subjugated by various Germanic tribes after the empire was destroyed. By the 6th century, they were reconquered by the Eastern Roman Empire (The Byzantines), and by the twelfth, Bosnia was reasonably autonomous, though caught between the warring Byzantine Empire and Kingdom of Hungary. In the 15th century, Bosnia was conquered by the Ottoman Empire, which  would go on to rule the region for the next four centuries. 

 The Ottomans had a huge impact on Bosnian ethnicity, religion, and culture. As such, Bosnian food is heavily influenced by Ottoman and Middle Eastern cuisines. It tends to be meaty, hearty and filling: Kebabs and Meze are common savoury foods, and Turkish desserts like Tulumba and Baklava are very popular. Tufahije itself is derived from a Persian dish which arrived in Bosnia via Istanbul- the word comes from the Arabic word for ‘apple’ ( تفاح, tuffah). Tufahije is especially popular at Eid, and is served with (very strong) coffee.

Dingoa, Trnovačko jezero, Maglić, 2007 <https://commons.wikimedia.org/wiki/File:Trnova%C4%8Dko_jezero,_Magli%C4%87.jpg> [accessed 11/02/2020] (commons license: https://creativecommons.org/licenses/by-sa/4.0/legalcode)